页面插件开发指引
我们以 商店插件 开发流程为例,来讲述如何开发一个同时具有多个页面、注入了多个插槽的插件
由于篇幅限制,我们仅在此篇文档中讲述其中的关键问题
分析业务
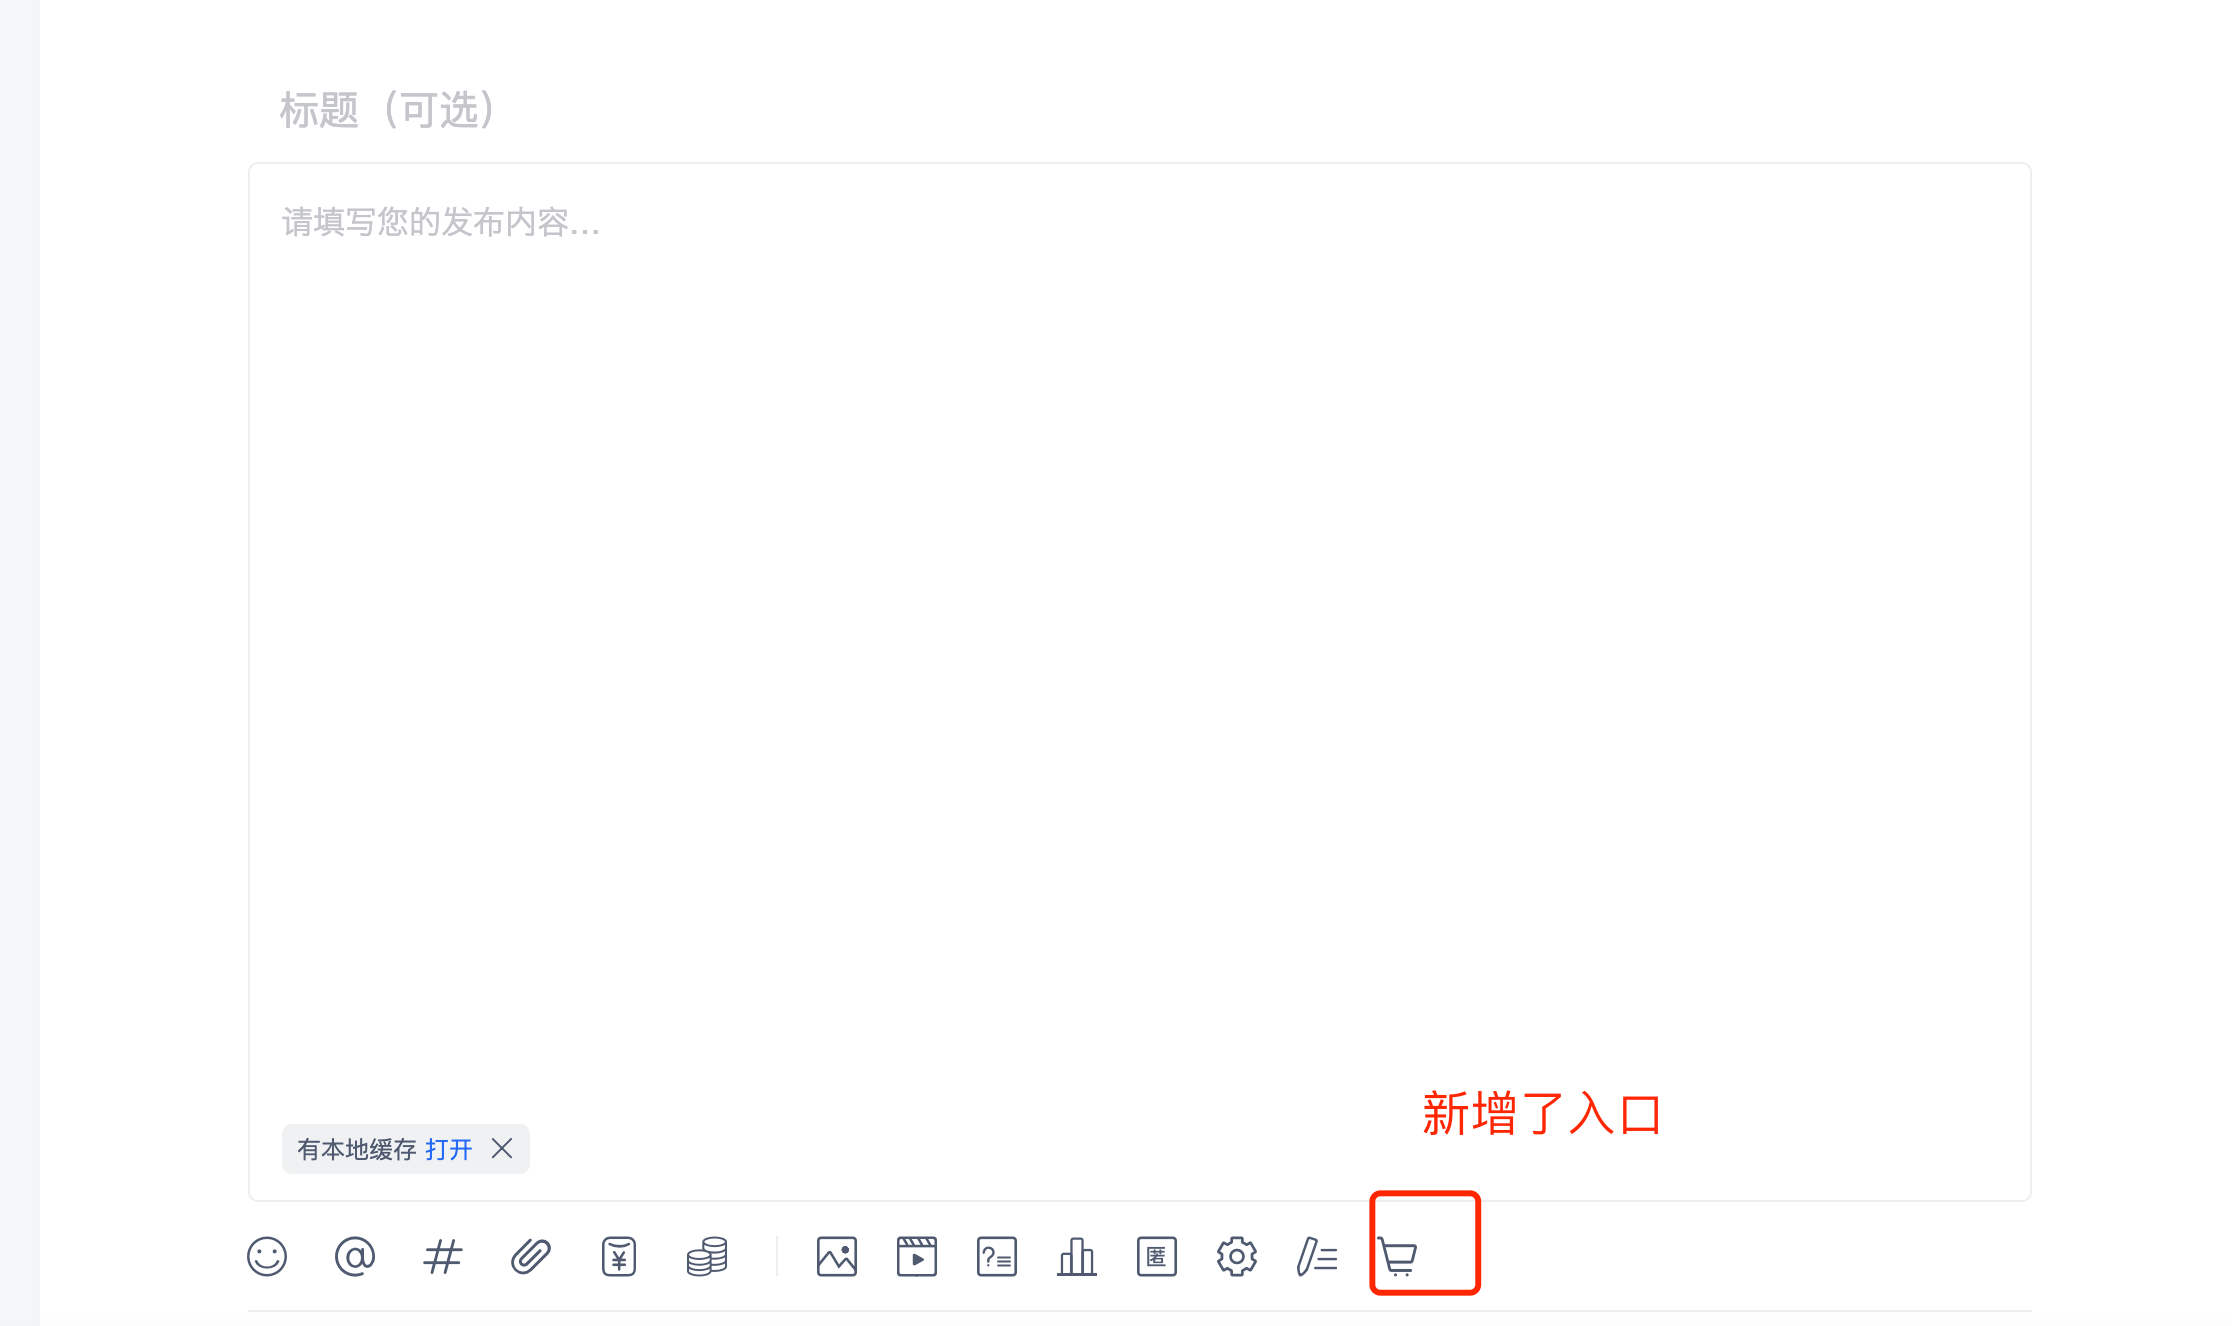
如下图,商店业务涉及到了囊括 发帖区域注册按钮、发帖内容区展示、商品选择页面、帖子详情内容区展示、个人中心功能区注册、二维码页面注册

使用插槽
根据左侧页面标识列表,我们分析
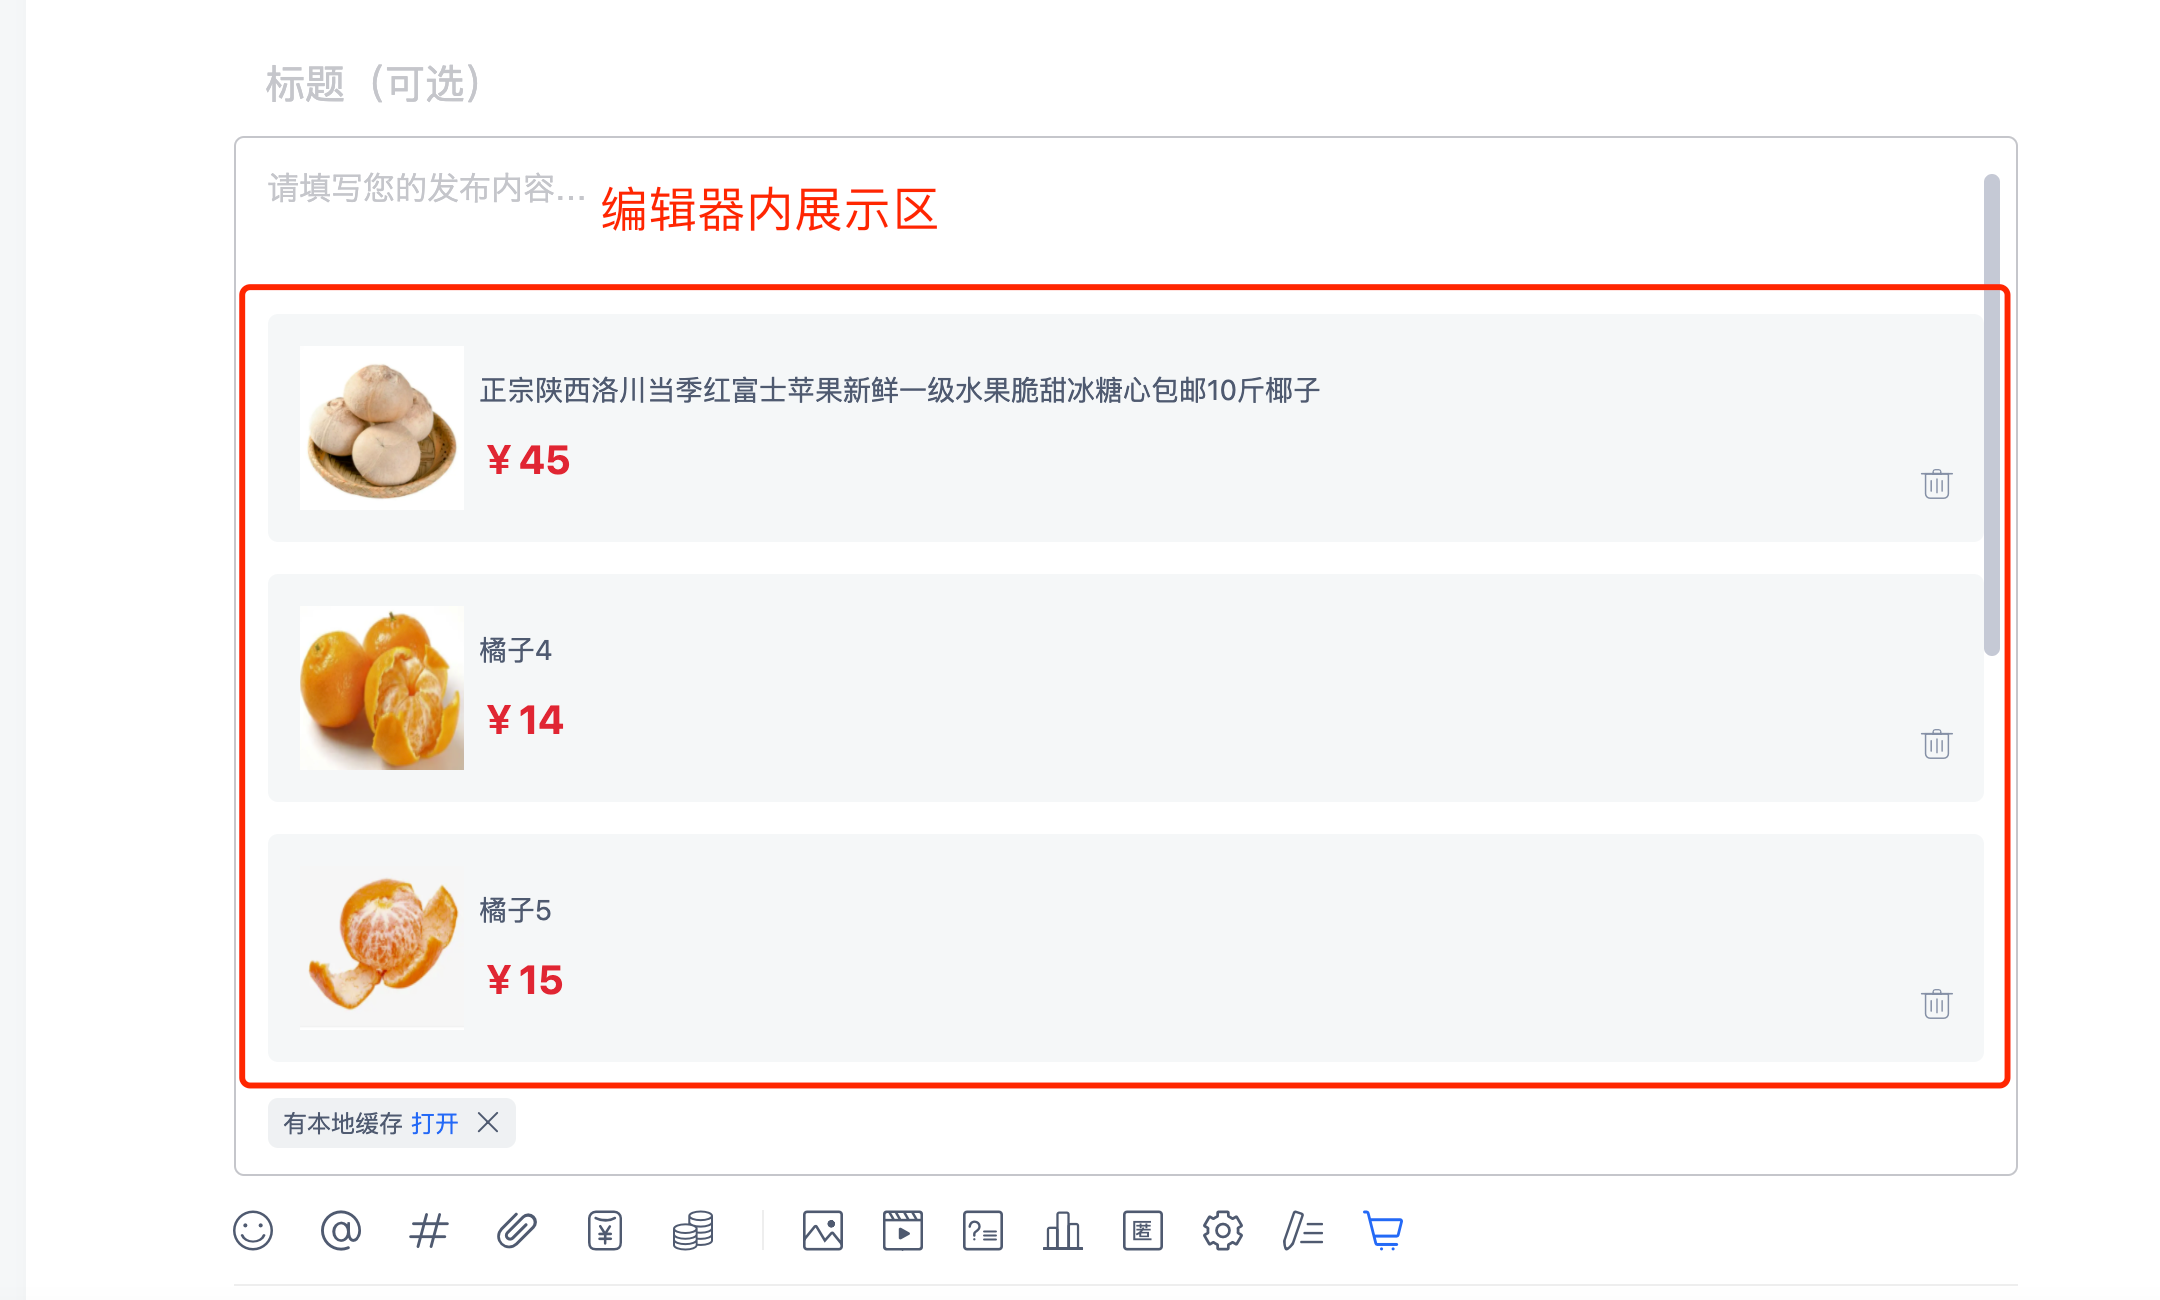
为了完成发帖部分的入口、发帖区展示
我们需要用到 plugin_post 中的 post_extension_entry_hook 和 post_extension_content_hook 这两个注入 hook
参见 发帖页Hooks列表
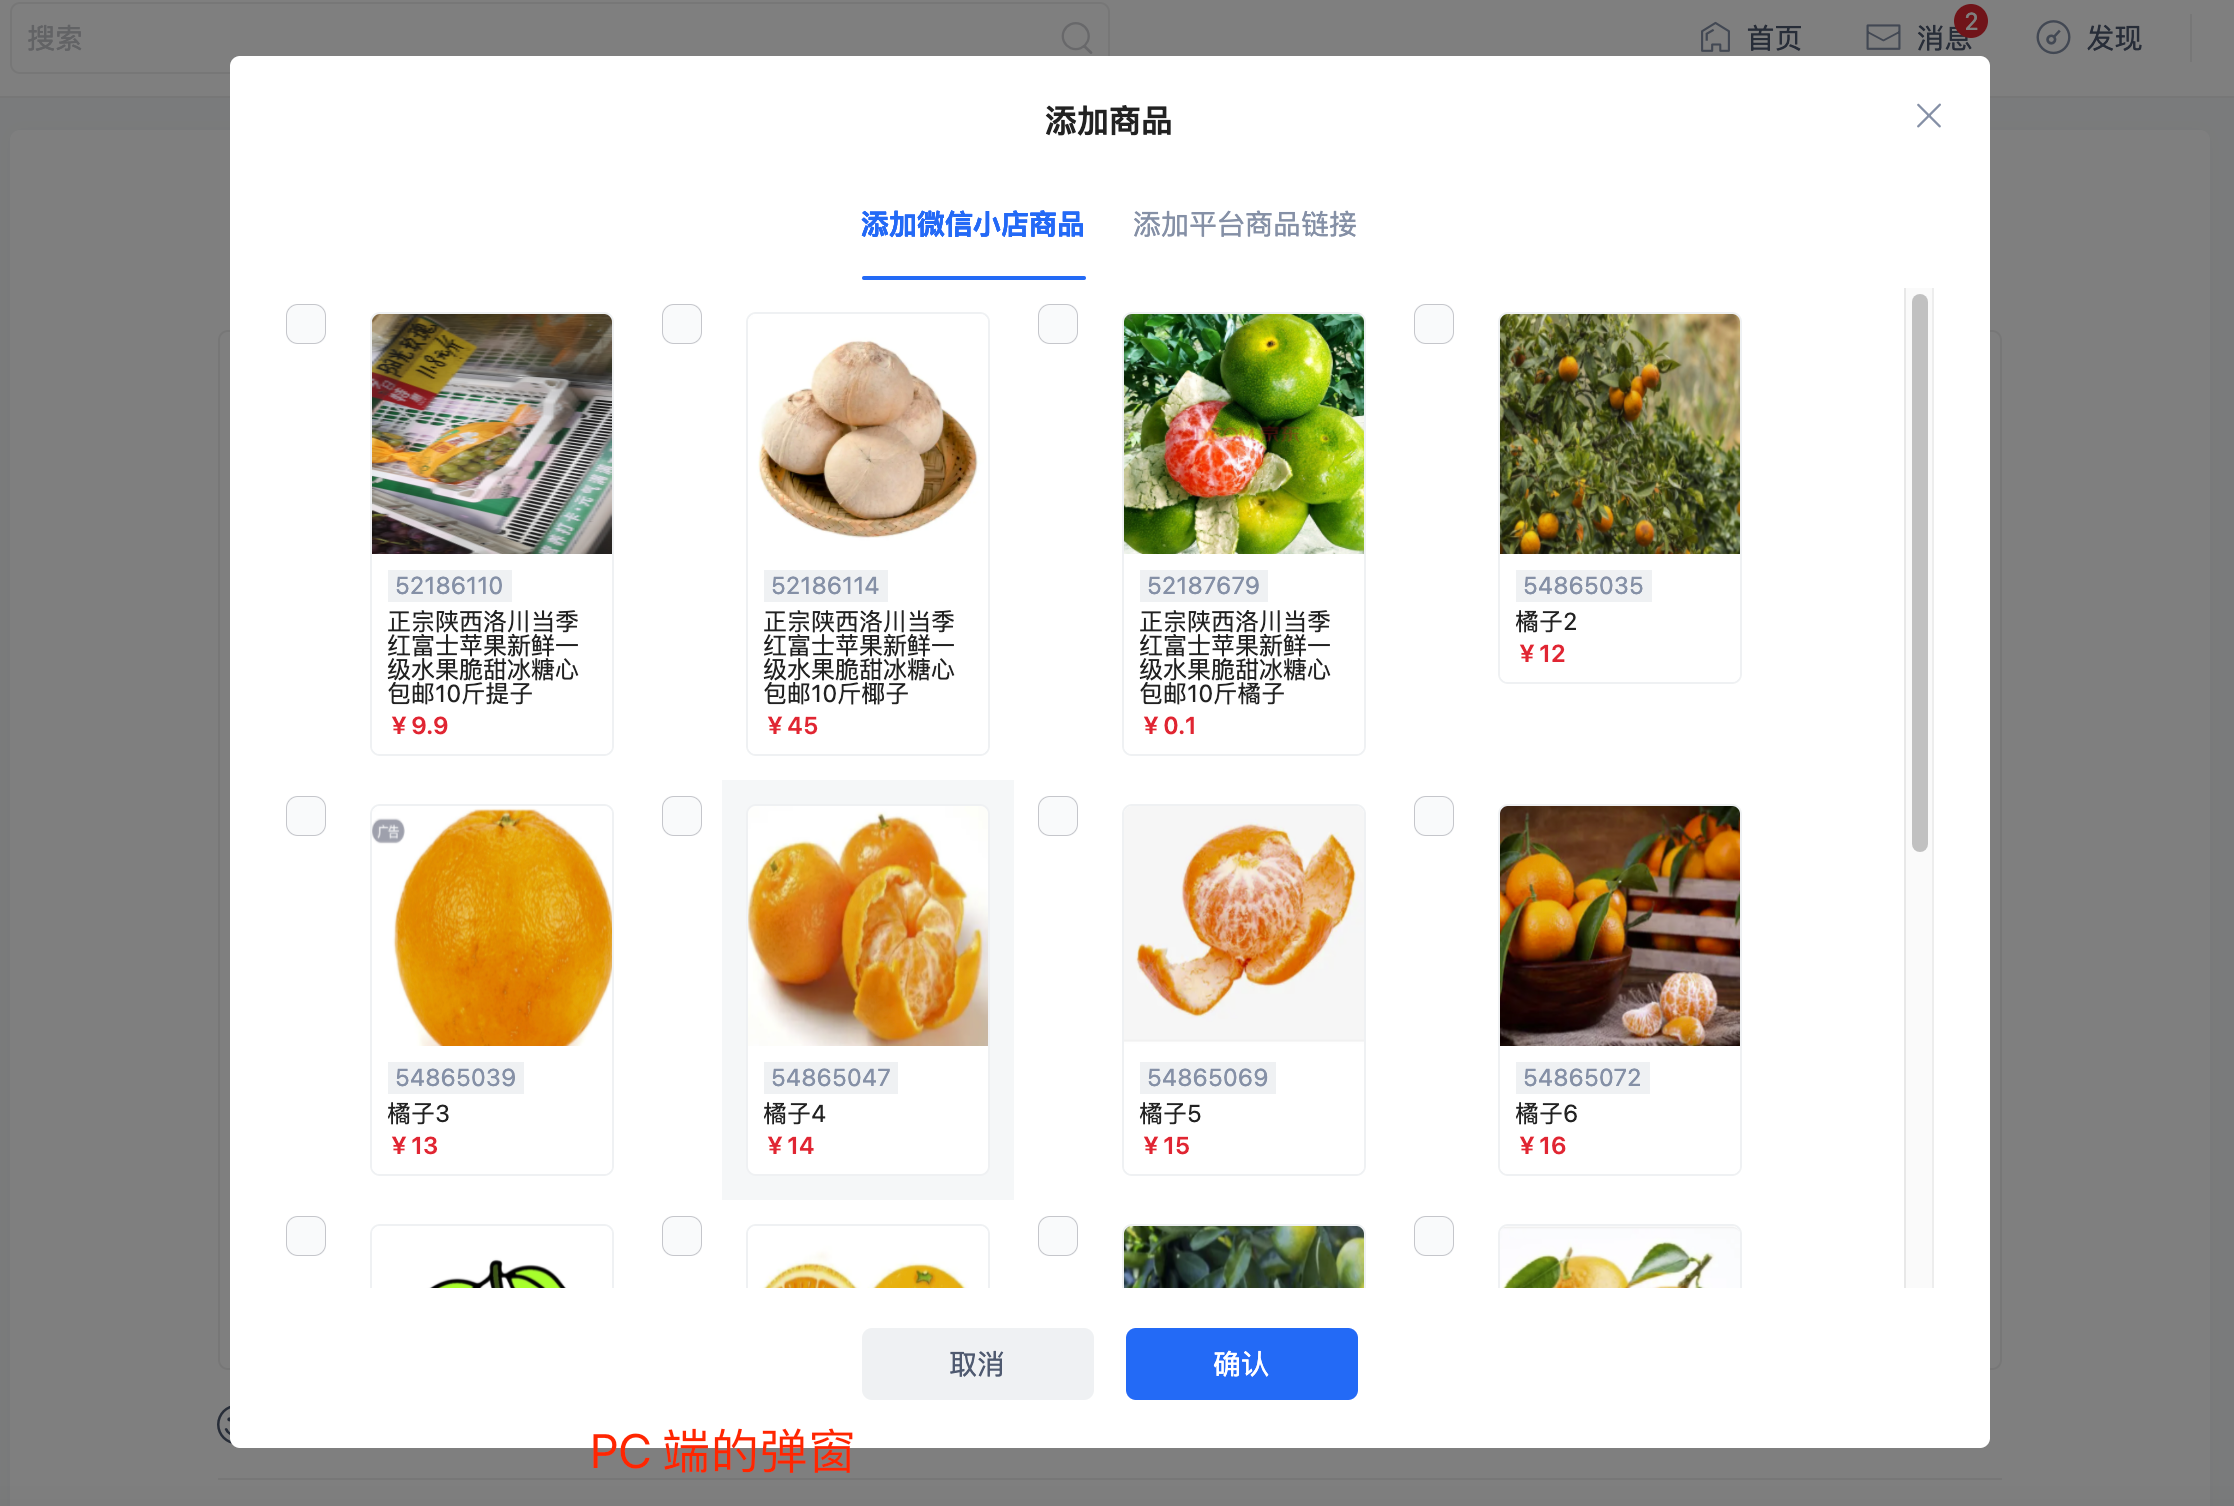
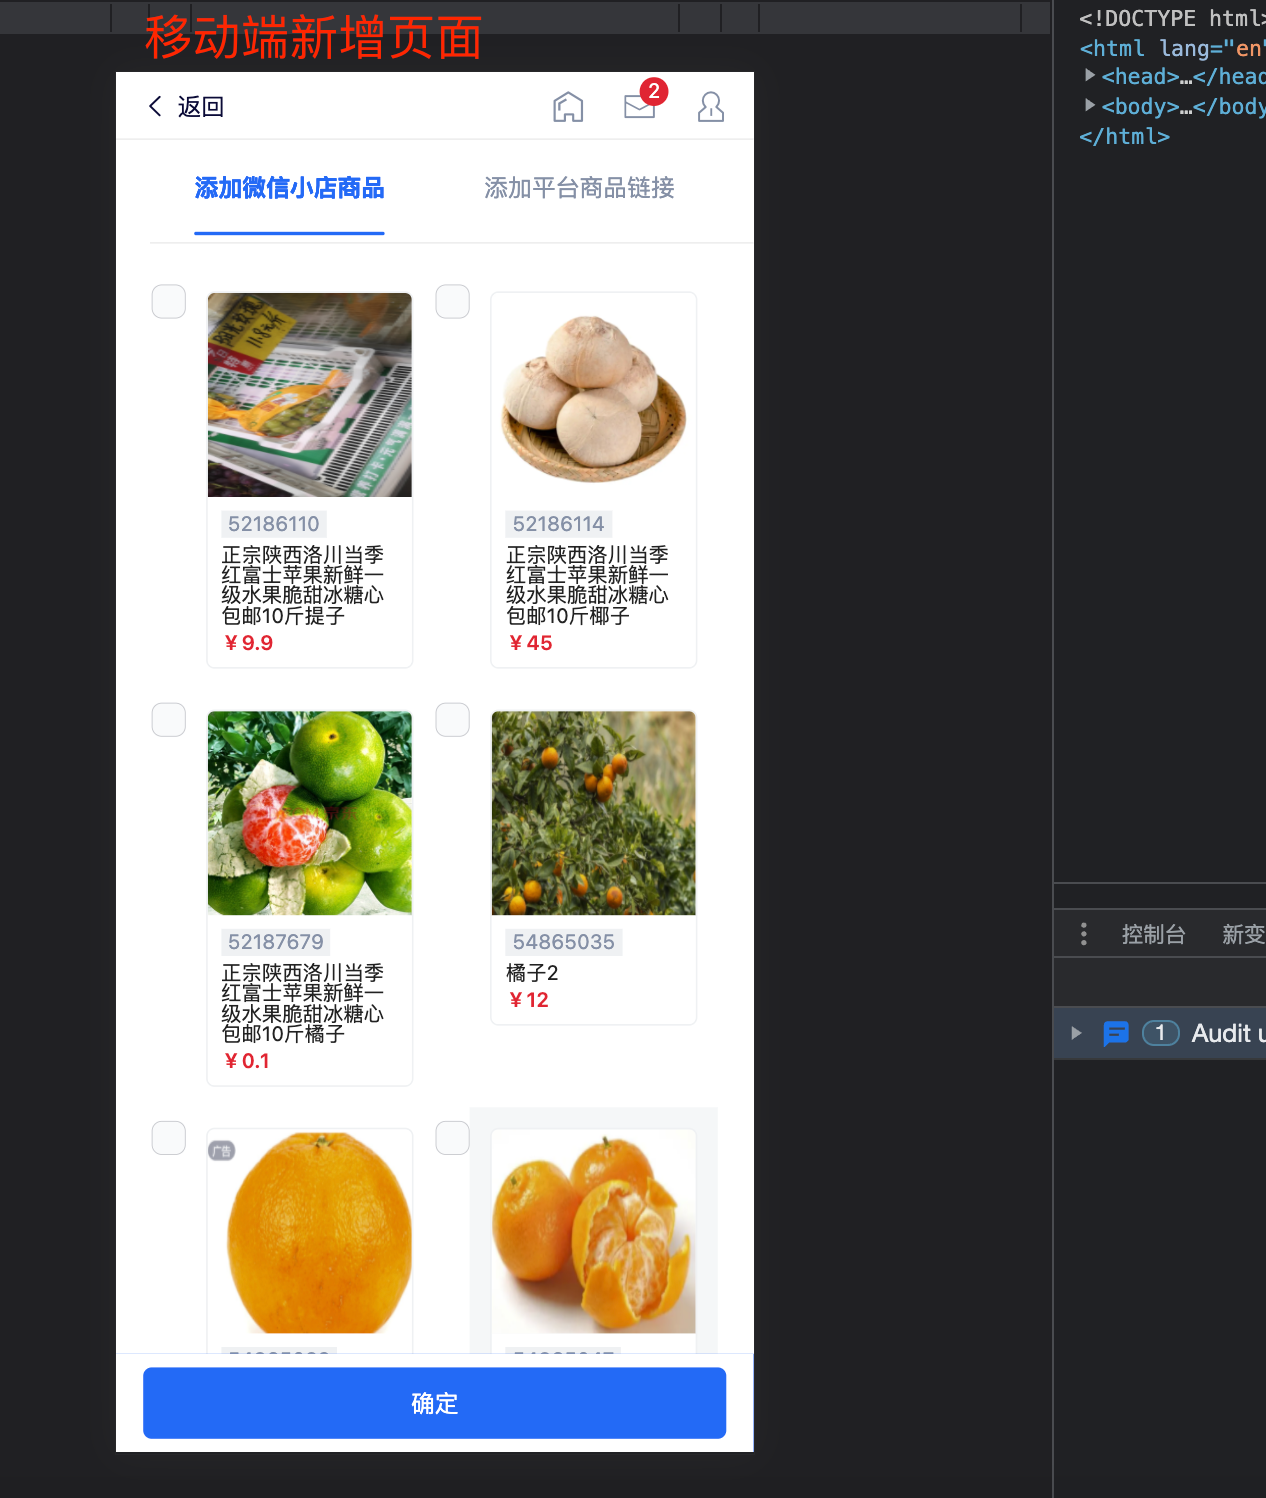
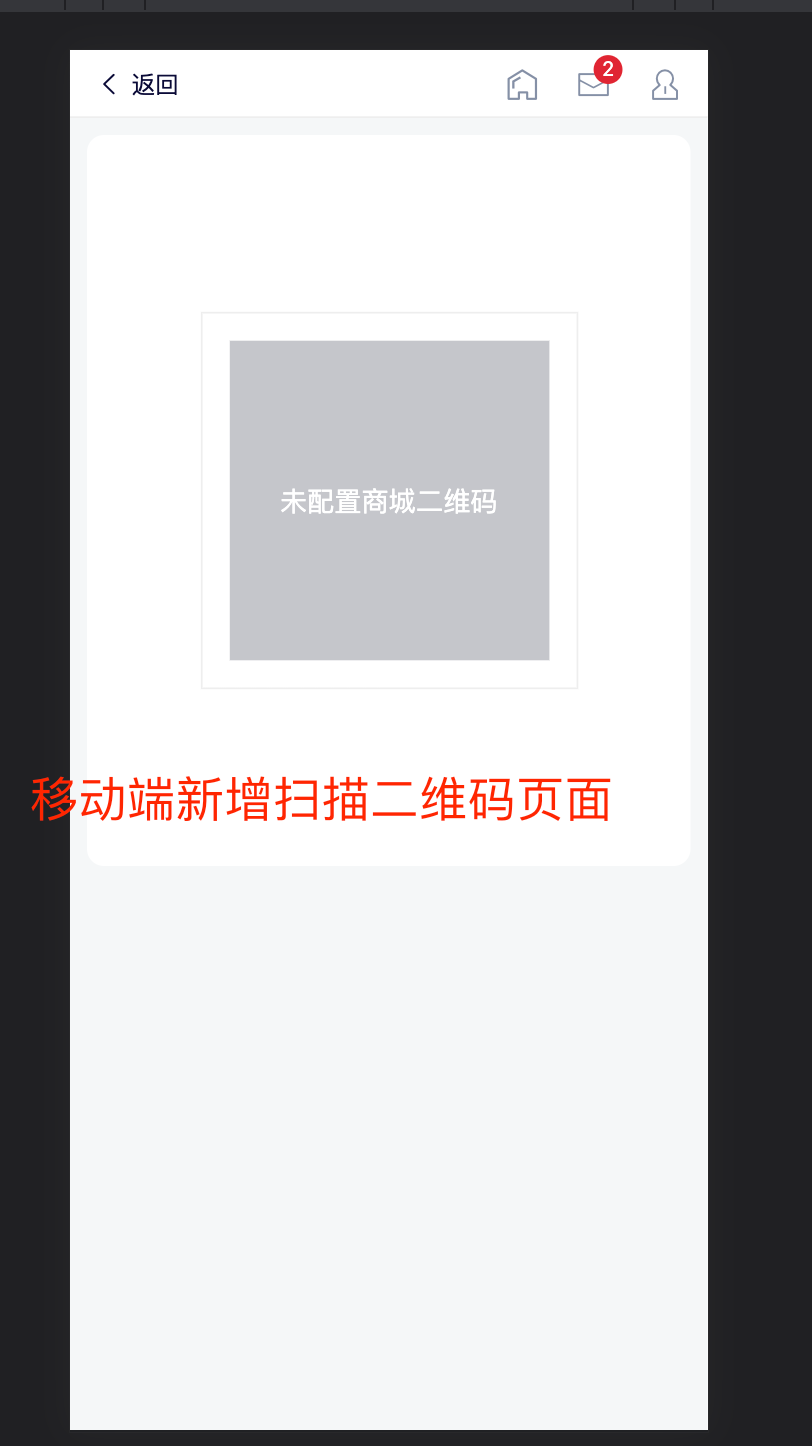
为了完成新增页面的能力,我们需要用到 plugin_system 中的 add_page_hook,来新增选择商品页面和展示小商店二维码页面
参见 全局Hooks列表
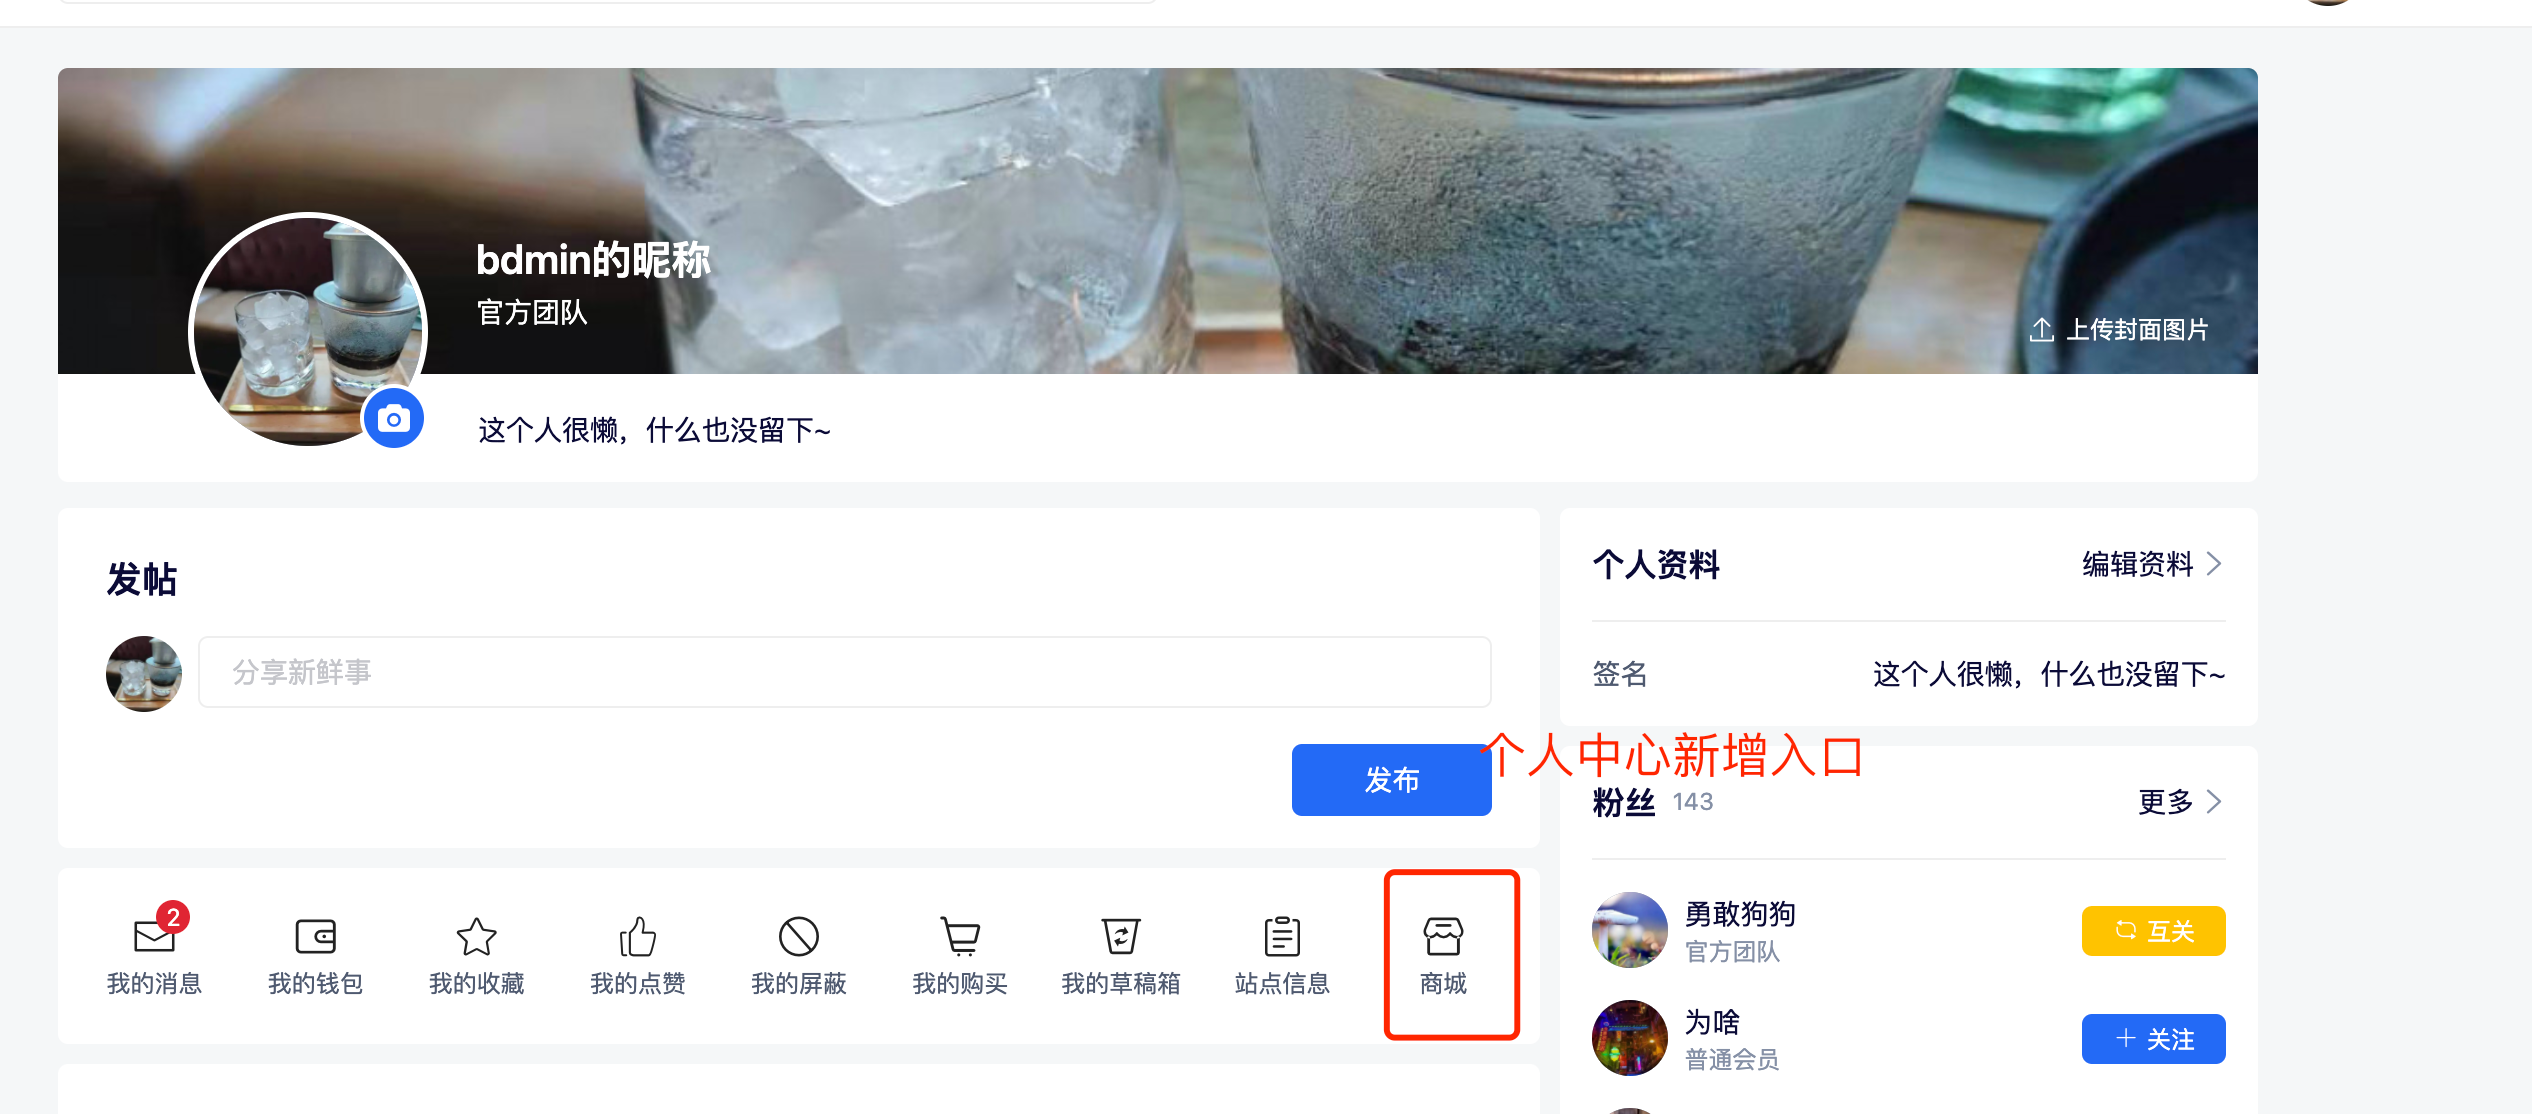
为了完成个人中心部分新增 商店 入口的能力,我们需要用到 plugin_user 中的 user_extension_action_hook, 来在个人中心中新增 商店 的入口
参见 个人中心Hooks列表
为了在帖子详情页和首页中展示我们插件对应的内容,我们需要用到 plugin_index 和 plugin_detail 中的 thread_extension_display_hook,来在首页、详情页中增加我们的展示
首页参见 首页Hooks列表
详情页参见 详情页Hooks列表
按照标准文档填写后,我们可以得到如下的项目配置
{
  "name_cn": "商品贴插件",
  "name_en": "shop",
  "description": "商品贴插件",
  "type": 9,
  "app_id": "61540fef8f4de8",
  "version": "1.0.0",
  "status": 1,
  "icon": "https://discuz.chat/dzq-img/active.png",
  "filter_enable": false,
  "author": {
    "name": "腾讯科技(深圳)有限公司",
    "email": "bababaababa@tencent.com"
  },
  "view": {
    "display": {
      "target": ["plugin_index", "plugin_detail"],
      "hookName": "thread_extension_display_hook",
      "platform": ["pc", "h5", "mini"],
      "disables": false
    },
    "postDisplay": {
      "version": "1.0.0",
      "target": "plugin_post",
      "hookName": "post_extension_content_hook",
      "platform": ["pc", "h5", "mini"],
      "disables": false
    },
    "postEntry": {
      "target": "plugin_post",
      "hookName": "post_extension_entry_hook",
      "platform": ["pc", "h5", "mini"],
      "disables": false
    },
    "qrCodePage": {
      "target": "plugin_system",
      "hookName": "add_page_hook",
      "platform": ["pc", "h5"],
      "path": "/minishop/qrcode",
      "miniPageConfig": {
        "navigationBarTitleText": "二维码"
      },
      "disables": false
    },
    "selectProductPage": {
      "target": "plugin_system",
      "hookName": "add_page_hook",
      "platform": ["pc", "h5", "mini"],
      "path": "/selectProduct",
      "miniPageConfig": {
        "navigationBarTitleText": "选择商品"
      },
      "disables": false
    },
    "userCenterEntry": {
      "target": "plugin_user",
      "hookName": "user_extension_action_hook",
      "platform": ["pc", "h5", "mini"],
      "disables": false
    }
  }
}
插件项目结构
根据上述的配置,按照目录规范的要求,我们可以得到下图所示的目录结构
目录规范要求参见 目录规范
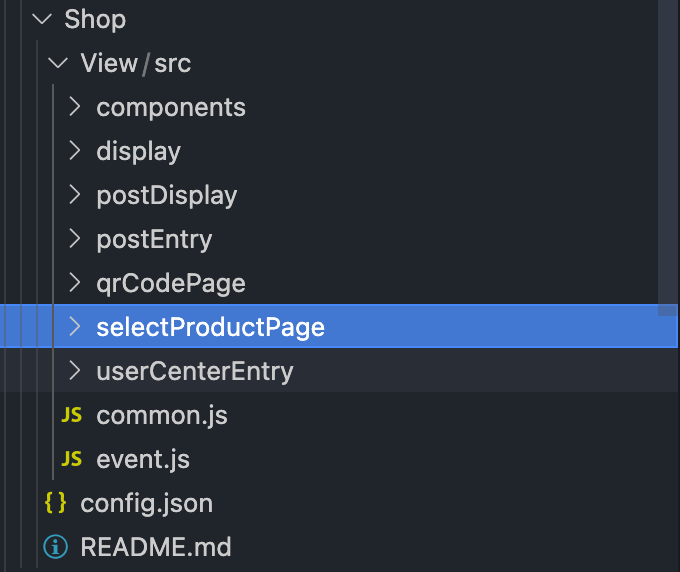
如上,其中 selectProductPage 目录对应了 h5 和 小程序 中新增的选择商品
qrCodePage目录对应了h5的微信小商店二维码页面
选择商品页面对应的页面路径分别为web->/plugin/selectProduct
小程序->/pluginPages/selectProduct/index
小商店二维码页面对应的页面路径分别为web->/plugin/minishop/qrcode
小程序->/pluginPages/minishop/qrcode/index
自定义 API 调用
在 商店插件 中,我们在 后台插件 中新增了 获取小商品列表 和 获取第三方商品分析 的接口
根据 通用参数 文档可知,我们可以通过 this.props.dzqRequest 获取到 http 客户端实例,并且我们封装了统一的请求错误处理函数 this.props.dzqRequestHandleError
以获取微信小商店商品列表为例,我们可以在对应的组件中声明如下
fetchMiniShopProductList = async (page) => {
  const { dzqRequest } = this.props;

  // 请求前 loading
  this.setState({
    loading: true,
  });

  try {
    // 请求声明
    const { code, data, msg } = await dzqRequest.request.http({
      url: "/plugin/shop/api/wxshop/list",
      method: "GET",
      params: {
        page,
        perPage: "16",
      },
    });

    if (code !== 0) {
      Toast.error({
        content: msg,
      });
    }

    //业务逻辑
    const { totalCount, totalPage, pageData, currentPage } = data;

    const { miniShopProducts } = this.state;

    const nextMiniShopProducts = Object.assign(
      {},
      {
        [currentPage]: pageData,
        ...miniShopProducts,
      }
    );
    this.setState({
      totalPage,
      totalCount,
      miniShopProducts: nextMiniShopProducts,
    });
    //业务逻辑

    //处理 loading 状态
    this.setState({
      loading: false,
    });

    return nextMiniShopProducts;
  } catch (error) {
    //处理 loading 状态
    this.setState({
      loading: false,
    });

    //错误兜底处理
    this.props.dzqRequestHandleError(error);
  }
};
如此,我们便拥有了请求自定义 API 的能力
多个 hook 组件间代码复用
在 商店插件 中,小商店的 商品项 组件是 小程序商品选择页、h5商品选择页、pc商品选择弹窗 中共用的一个组件
这里我们在 View 目录下创建 components 目录,用来放置共用的组件
这里我们创建 shopProductItem 组件,里面创建 web 和 mini 两个目录
利用 适配器模式 实现 端区分,实现小程序的逻辑于 mini 目录中,实现 web 的逻辑于 web 中
适配器模式 可以参见:多端适配器
其代码如下
index.jsx
let pluginComponent = () => {};
if (process.env.DISCUZ_ENV === 'mini') {
  pluginComponent = require('./mini/index.jsx');
}
if (process.env.DISCUZ_ENV === 'web') {
  pluginComponent = require('./web/index.jsx');
}

export default pluginComponent.default;
那么在各个注入 hook 的实现中,我们可以以如下代码进行引入
这里可以自行区分不同端,完成代码复用
import ShopProductItem from '../../../components/shopProductItem'; // 后面为对应目录层级获取插件对应的后台配置
我们的插件有对应的后台管理系统部分,在那里进行了插件相关属性的配置声明
每个插件具有自己独一无二的 appid
我们将所有的插件配置信息进行了统一的获取与存储,都存储于 this.props.siteData.pluginConfig 中,仅需通过查找其中 app_id 相等的一项,即可获取到自己对应的插件配置
const { siteData = {} } = this.props || {};
const pluginConfig = siteData.pluginConfig || [];

const shopPluginConfig = pluginConfig.find((currentPluginConfig) => {
  if (currentPluginConfig.app_id === '61540fef8f4de8') {
    return currentPluginConfig;
}
路由跳转能力
DZQ 的项目 web 和 小程序 使用了不同的框架,故其对应的路由方法也不同
在 DZQ sdk 中,我们提供了统一的抽象
参见: Router 路由
商店插件 中,我们用到需要主动的回跳以及跳转到对应的插件注册的页面
我们使用插件内置的 sdk 抽象参数
参见:通用参数 中的 dzqRouter
返回逻辑
  handleConfirm = async () => {
    /**balabala
     **/

    //
    const { dzqRouter } = this.props;

    if (typeof window !== 'undefined') {
      if (window.history.length <= 1) {
        dzqRouter.replace({ url: '/thread/post' });
        return;
      }

      dzqRouter.back();
    }
跳转到插件页逻辑
      const { dzqRouter } = this.props;
      const { router } = dzqRouter;

      //balabala

      dzqRouter.push({ url: '/plugin/selectProduct' });
对于小程序,我们可以直接使用 Taro 提供的路由来完成页面跳转
import Taro from '@tarojs/taro';

  handleIconClick = () => {
    //balalala

    Taro.navigateTo({ url: '/pluginPages/selectProduct/index' });
  };
小程序页面生命周期
由于 DZQ 的页面级插件暴露出来的并非是标准的 Taro 页面,所以我们没有办法通过直接使用 Taro 页面生命周期来完成生命周期方法的声明
在 商店插件 中,我们需要注册自定义的触底事件,故此我们采用被劫持的 页面事件能力
页面事件能力参见: 全局Hooks列表
实现代码如下
  componentDidMount = () => {
    this.props.pluginAction.registerLifecycle('onReachBottom', this.onReachBottom);
  }

    /**
   * 触底逻辑
   */
  onReachBottom = () => {
    if (this.state.currentPage < this.state.totalPage) {
      this.fetchMiniShopProductList(this.state.currentPage + 1);

      this.setState({
        currentPage: this.state.currentPage + 1,
      });
    }
  };
自定义页面与发帖插槽组件间的通信
在小商店需求中,我们新增的页面并没有直接操作编辑器编辑区数据的能力
但编辑器区的插槽组件拥有这个对应的能力,所以我们通过实现两者间的通信,来完成数据的交换
插件数据通信参见: 插件数据通信
在 商店插件 中,我们共用了 shop 的 store 空间
编辑器同步数据到选择商品页面
我们在编辑器拉到最新的帖子数据后(如果是编辑现有的帖子),当用户打开选择商品页面时,我们同步数据到 store 内
      this.setState({ visible: true });

      await this.fetchMiniShopProductList();
    } else {
      const { dzqRouter } = this.props;

      const currentPluginStore = this.props.pluginAction.get('shop');
      if (currentPluginStore) {
        this.props.pluginAction.set('shop', {
          ...currentPluginStore,
          renderData: this.props.postData.plugin.shop,
        });
      } else {
        this.props.pluginAction.set('shop', {
          renderData: this.props.postData.plugin.shop,
        });
      }

      dzqRouter.push({ url: '/plugin/selectProduct' });
    }
在 选择商品页 内,我们还原这个数据到 选择商品页 的局部 state 中
  init = () => {
    const currentPluginStore = this.props.pluginAction.get('shop');

    let { activeTab = 'miniShop' } = currentPluginStore || {};

    if (!isShowMiniShopTab(this.props)) {
      if (activeTab === 'miniShop') {
        activeTab = 'platformShop';
      }
    }

    const { body } = currentPluginStore.renderData || {};
    const { products } = body || { products: [] };

    let platformProductLink = '';
    const currentMiniShopProducts = {};

    products.forEach((productInfo) => {
      if (productInfo.type === MINI_SHOP_TYPE) {
        currentMiniShopProducts[productInfo.data.productId] = productInfo.data;
      }

      if (productInfo.type === PLATFORM_SHOP_TYPE) {
        platformProductLink = productInfo.data.readyContent;
      }
    });

    this.setState({
      selectedMiniShopProducts: currentMiniShopProducts,
      link: platformProductLink,
      activeTab,
    });
  };
至此,我们实现了同步 编辑器内数据 到 选择商品页 的能力
选择商品页面同步数据到编辑器
由于 post_extension_content_hook 钩子会在编辑器页面挂载后一直存续。且这个钩子具有通过内置方法修改编辑器内容区数据的能力,故此,我们选择这个钩子的组件来接受我们的数据传递,在 商店 插件中,其对应了 postDisplay 组件
我们在 选择商品页面 内,通过给 shop store 传递 shopPluginData 字段数据,来存储我们希望传递给发帖区的数据
  handleConfirm = async () => {
    let product;
    if (this.state.link) {
      product = await this.fetchProductAnalysis({ address: this.state.link });
    }

    const miniShopProducts = Object.keys(this.state.selectedMiniShopProducts);

    const postData = this.postDataAdapter({
      product,
      miniShopProducts,
    });

    this.props.pluginAction.set('shop', {
      shopPluginData: {
        postData: {
          tomId: '61540fef8f4de8',
          body: {
            products: postData,
          },
        },
      },
    });

    const { dzqRouter } = this.props;

    if (typeof window !== 'undefined') {
      if (window.history.length <= 1) {
        dzqRouter.replace({ url: '/thread/post' });
        return;
      }

      dzqRouter.back();
    }
  };
在 postDisplay 组件中,我们通过读取位于 shop store 中的 shopPluginData 来更新最新的发帖区数据,并且把已经消费的数据清空
  componentDidMount() {
    const selectPagePluginData = this.props.pluginAction.get('shop');

    if (selectPagePluginData) {
      const { shopPluginData } = selectPagePluginData;
      if (shopPluginData && shopPluginData.postData && shopPluginData.postData.tomId) {
        this.props.updatePlugin(shopPluginData);

        // 消费掉后去除
        this.props.pluginAction.set('shop', {
          shopPluginData: null,
        });
      }
    }
}至此,选择商品页 选择的数据已经成功同步到了 编辑器编辑区